
Undeletable and Unrenamable folders in windows are not new to us. There are numerous documents and folders which make issues when either erase or rename.
At whatever point we are happy to erase garbage documents and folders from our PCs, issues happen. Take a gander at the picture beneath.
It says “The action can’t be completed because the file is open in Windows Explorer“.
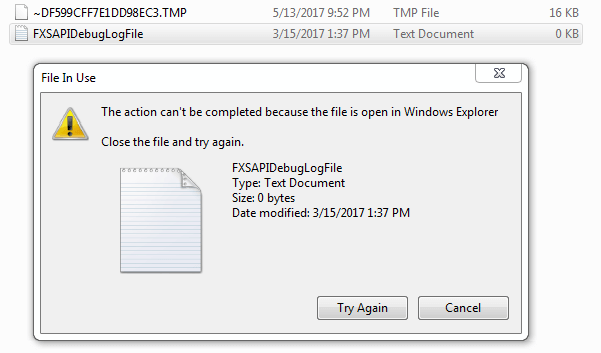
In any case, when you attempted to close the record, it denied.
These sorts of records and folders are important for your windows to work.
You can erase them by means of CMD. This will cover later in our instructional exercises.
Yet, for the great stunt or to pick up something stunning, you can make an undeletable and unrenamable folder in windows without any problem.
How To Create Undeletable and Unrenamable Folders
In this tutorial, I’ll give you how you can undoubtedly make an undeletable and unrenamable folder in windows. We should perceive how to do it:
- Open CMD as an administrator.
- Now, type in the command md con\ and hit enter.
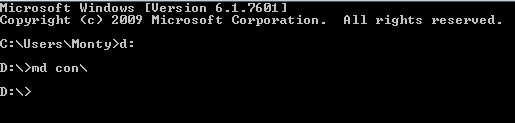
- Remember you cannot create a folder in the root directory of the windows (in which your OS is installed, C:)
- To change the directory, type D: and hit enter. You can change according to your disk drives. You can also open CMD anywhere in the windows by pressing shift+right click>open command prompt window here.
- Now go to the directory, the folder will be there & unable to delete and rename.
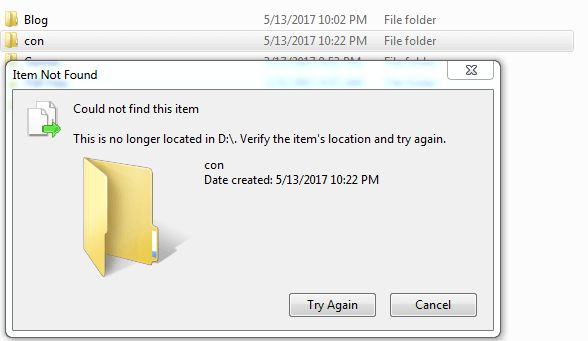
Look at that it isn’t erasing and renaming the folder you’ve made.
How To Delete The Folder
Presently, after you’ve made the folder, you may be thinking about how to erase this in the event that it is undeletable and unrenamable. Follow the steps to delete the folder.
- Open CMD, go to the directory where the folder is located.
- Type in the command rd con\
- Check the folder is removed from there.
So, it’s all about the tutorial. See you in the next one.
Remember to share this stunning stunt.