The Windows Registry is an in-built utility tool that helps the operating system managing the system and helps the various applications and programs use the computer’s resources wisely.
If you are using the Registry Editor, a Windows user can create, modify, delete registry keys, subkeys, and values.
Since the registry basically have all the important data that resides in your system, it is a good idea to back it up before you make any changes in the registry editor.
After all, you wouldn’t want to lose all your data because of a minor change. This article discusses the various methods to back up and restore your Windows Registry.
These steps apply to both Windows 10 and Windows 11. The Registry Editor interface is nearly the same in both versions, so the methods for backup and restoration are consistent.
How To Backup your Windows Registry
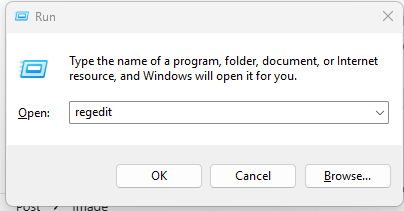
Go to Start on your Windows laptop/desktop and search for Run OR Press the shortcut key Windows + R.
Type regedit in Run and click on OK.
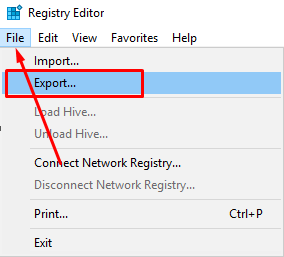
In the Registry Editor, from the menu bar on the top, click on File.
Click on Export. Tip: If you use OneDrive or another cloud storage service, save your .reg backup file directly to the cloud. This keeps your registry backup safe even if your local hard drive fails.
In the Export Registry File window, type the name of the file for backup. Choose an appropriate naming convention so you can identify the file later when needed.
At the bottom of the window, you must be able to see the “Export range” section.
Select either “All” to backup your Windows Registry or “Selected branch” if you want to backup only a particular registry key.
Click on Save. It might take a few minutes to back up the registry. The backup will be in the form of a .reg file.
How to Restore Your Windows Registry
Method 1
Go to Start on your Windows laptop/desktop and search for Run OR Press the shortcut key Windows + R.
Type regedit in Run and click on OK.
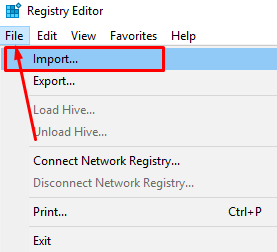
In the Registry Editor, click on File in the menu bar at the top.
Click on Import.
In the dialog box that pops up, navigate to the path where the backup file that you want to restore is located.
Find the location of the backup file you want to restore.
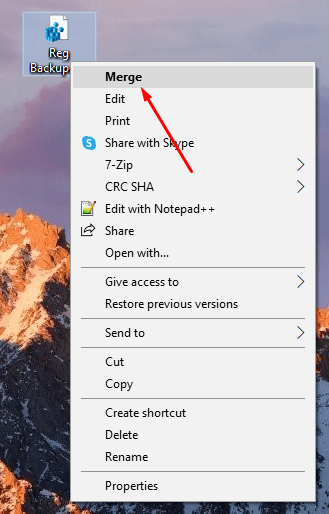
Right-click on the .reg file.
Select the Merge option.
In the box that appears, click Yes to confirm you want to restore the registry.
You can also double-click on the backup .reg file to restore it.
Method 3
Some third-party applications that you can use to restore your Windows Registry are Registrar Registry Manager and Tweaking.com Registry Backup (free & reliable).
Note: Most users don’t need third-party apps because Windows already has a built-in backup and restore option.
If your system is not booting, you can restore the registry from the Windows Recovery Environment (WinRE). You can this by booting into the Advanced Startup Options, then go to Troubleshoot, Advanced Options, and Command Prompt. Here, use the reg import command to import the .reg file.
Important: You need be careful when editing or restoring the Windows Registry. The reason behind this is if you are making mistakes, you can cause your system stop Windows from booting. Therefore, always create a full system restore point first, and then back up the registry.
Conclusion
Using these quick and easy steps, you can back up and restore your Windows Registry. Now, whenever you want to make changes to the registry, you can use this method to back it up and restore it later.
Did this article help you? Share it with your friends if you found it useful.
FAQs on Backing Up and Restoring Windows Registry
Does Windows automatically back up the registry? Yes, Windows creates registry backups during system restore points. But for extra safety, you should export manually before making changes.
Can I restore a registry backup from Windows 10 to Windows 11? No. Registry backups should only be restored on the same system and Windows version they were created on.
Is it safe to use third-party registry cleaners? Generally, no. Microsoft discourages the use of registry cleaners because they can cause more harm than good.
Howdy, I’m Varun Sharma. I’m an Engineer & Geek. I am a fan of technology, programming, and entrepreneurship. Also, an artist & full entertainer dose by nature.