Do you want to enhance your Android device’s browsing experience? You can do so if you clear DNS cache on Android. This cache stores website addresses, aiding in faster browsing. However, it can sometimes lead to connectivity issues or outdated information. Our guide simplifies the process of clearing the DNS cache on your Android device, ensuring smooth internet use. Let’s dive into the world of DNS cache and learn how to manage it effectively.
Understanding DNS Cache
DNS cache on Android devices serves as a memory bank for storing the addresses of previously visited websites. This function, a key part of the Domain Name System (DNS), translates human-readable website names into IP addresses, which are essential for devices to access online content. By storing these addresses, the DNS cache reduces the need for repeated lookups, significantly speeding up browsing.
This caching mechanism ensures that when you revisit a website, your device retrieves the site’s IP address from the cache, not the DNS server. This process minimises loading times, offering a smoother internet experience. However, the cached information can sometimes become outdated or corrupt, leading to connectivity issues or incorrect website loading.
In such cases, clearing the DNS cache becomes essential. It’s also a step in protecting privacy, as it removes traces of your browsing history stored locally on your device. Regularly clearing the DNS cache can help in resolving these browsing issues and maintain your device’s privacy and efficiency.
Prepare Your Device to Clear DNS Cache On Android
Before clearing the DNS cache, it’s crucial to prepare your Android device. Start by backing up essential data. This precautionary step safeguards your information against any unforeseen issues during the process. Next, check for any pending system updates.
Updating your device ensures you’re using the latest features and security enhancements, which can sometimes resolve DNS-related issues without needing to clear the cache.
Lastly, ensure your device has sufficient battery life. If the battery is low, connect your device to a power source. This prevents the device from shutting down mid-process, which could lead to complications. These steps set a strong foundation for a smooth DNS cache clearing process.
Step-by-Step Guide to Clear DNS Cache on Android
Clearing the DNS cache on your Android device can be done through browser settings, system settings, or with the help of third-party apps. Here’s how to do it:
Clearing DNS Cache via Browser Settings:
- Google Chrome:
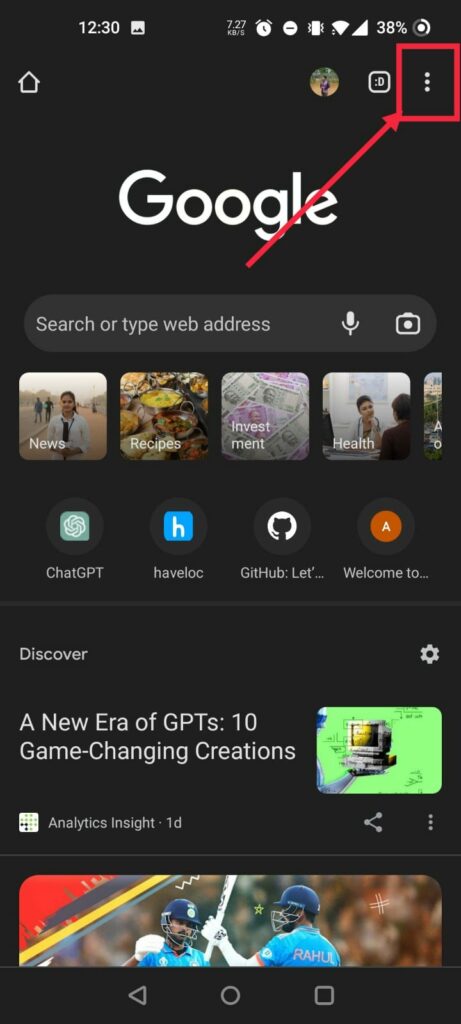
- Open Chrome and tap the three dots in the upper-right corner.
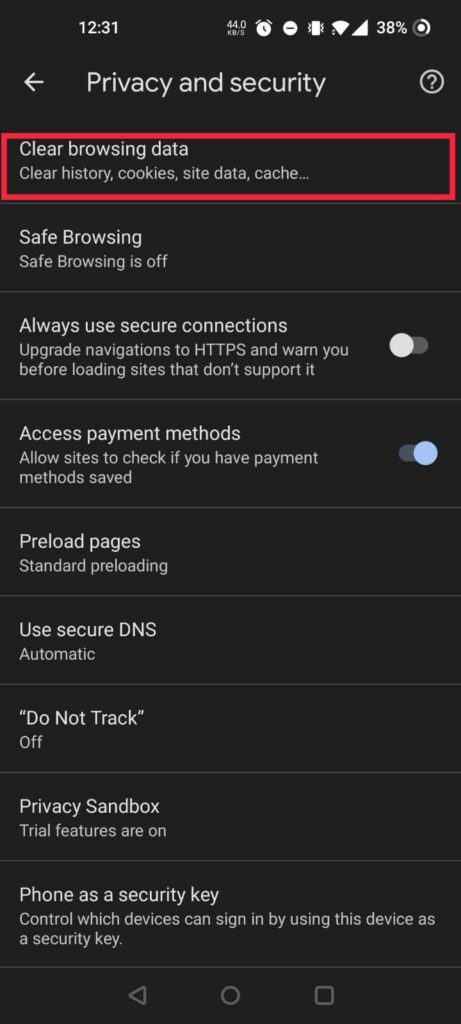
- Go to ‘Settings‘ > ‘Privacy‘ > ‘Clear browsing data’.
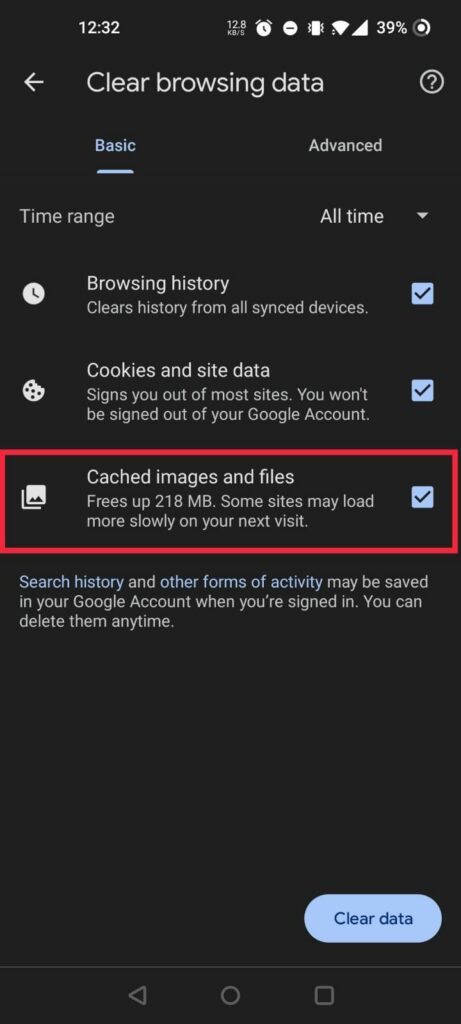
- Select ‘Cached images and files’ and tap ‘Clear data‘.
These steps will clear the browser cache, which includes DNS cache stored by these browsers.
Using Android System Settings:
- Open ‘Settings‘ on your Android device.
- Scroll down and tap on ‘System‘.
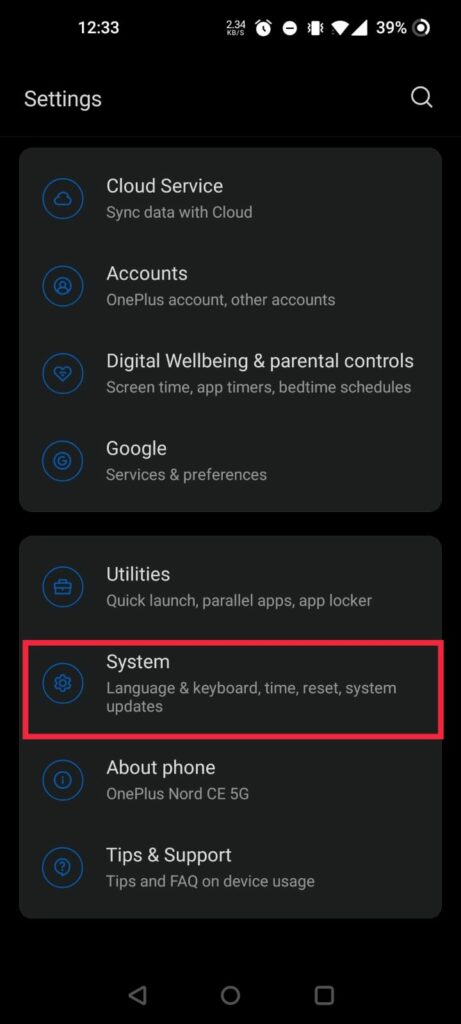
- Find and select ‘Advanced‘ to expand more options.
- Go to ‘Reset options‘ and select ‘Reset Wi-Fi, mobile & Bluetooth‘.
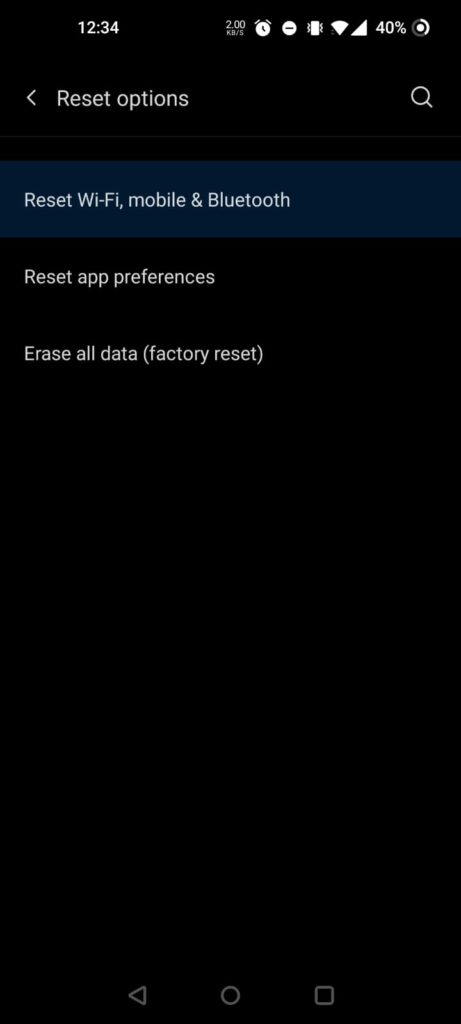
- Choose ‘Reset Settings‘ and confirm if prompted.
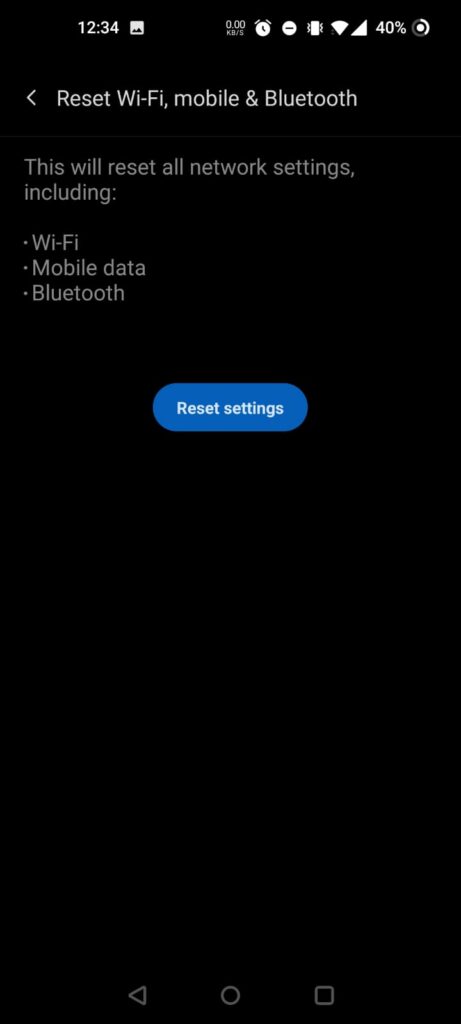
This method resets network settings, which includes clearing the DNS cache for your device.
Third-party Apps:
Several reliable apps can assist in clearing the DNS cache on Android. Apps like ‘DNS Changer‘ and ‘Fing – Network Tools‘ offer intuitive interfaces for managing DNS settings, including cache clearing. These apps can be particularly useful if the above methods don’t suit your needs or if you prefer a more straightforward approach. However, always ensure you download such apps from trusted sources like the Google Play Store to avoid security risks.
By following these steps, you can effectively clear the DNS cache on your Android device, potentially resolving connectivity issues and ensuring your internet browsing is both fast and secure.
Troubleshooting Common Issues
When clearing the DNS cache on Android, users might encounter some issues. Here’s how to address them:
- Options Not Available: If certain options for clearing the DNS cache aren’t available, your device’s version might not support them. In this case, try using third-party apps like ‘DNS Changer’ or ‘Fing – Network Tools’, which offer more flexibility in managing DNS settings.
- Process Not Working: If clearing the cache doesn’t resolve connectivity issues, try restarting your device. A reboot can often fix minor glitches that affect the cache clearing process.
- Browser Cache Issues: If issues persist after clearing the cache in a specific browser, consider using a different browser to check if the problem is isolated to the original browser.
- Network Connection Problems: Post-cache clearing, if you experience network connection issues, try forgetting the Wi-Fi network on your device and then reconnecting. This often refreshes the network connection and resolves related problems.
- Last Resort – Factory Reset: If all else fails and DNS issues continue, a factory reset could be the solution. Remember, this should be your last resort as it erases all data on your device. Ensure you back up important data before proceeding.
Maintaining Your Android Device Post-Clearing DNS Cache
After clearing the DNS cache, regular maintenance of your Android device is key to optimal performance. Firstly, clear the cache periodically, especially if you frequently browse different websites or use various online services.
Doing this every few months can keep your browsing experience smooth. Additionally, keep your device’s software updated. Regular updates not only bring new features but also optimise the device’s performance and security. It’s also beneficial to periodically review and manage installed apps, removing those that are no longer used.
This frees up space and resources, allowing your device to run more efficiently. Regular attention to these aspects ensures your Android device remains fast and responsive.
Read Related:
- How to Clear Browser Cache In Google Chrome [Fast]
- Offline Browsing – How to Enable in Google Chrome
- Private Browsing – How to Enable In any Web Browser (FAST)
Conclusion
Understanding how to clear the DNS cache on your Android device is a key skill in today’s connected world. Not only does it resolve common browsing issues, but it also contributes to your device’s overall health and privacy. Regularly performing this task, along with routine maintenance and updates, ensures your device runs smoothly and efficiently. Embrace these simple yet effective practices to enhance your digital experience. Remember, a well-maintained device leads to a more seamless and enjoyable technology journey. Keep exploring, learning, and staying ahead in the fast-paced digital landscape.