
Here’s how to disable Google Chrome automatic updates feature. Previously Google allowed users to choose whether to update the Chrome browser or not. But with the passage of time, we witnessed a drastic shift in Google’s approach to handling the Google Chrome Browser updates.
Users can no longer manually set chrome updates ON or OFF. Google decides when and how your Chrome Browser will receive updates.
Sometimes new changes brought to the Chrome interface and features may not be to everyone’s liking, or you want to stick to the current version as it works best on your device and a new update may make the browser run slow or crash for some reason.
Google Chrome is updated automatically. But those who want to control when to update Google Chrome and how to disable automatic updates on the Chrome browser can see a guide below to learn how to manage Chrome browser updates.
Following Google’s lead, Mozilla also introduced this automatic update feature in the Firefox web browser recently. Mozilla Firefox updates to the latest updated version automatically as soon as the new update becomes available.
There are several reasons you opt to forget the latest web browser update, chief among which is the uncertainty about the new update’s stability. Google may remove some or all of your favorite features of the current version in the updated version.
And also, new updates often carry some bugs which are only spotted and fixed after the public release, so it’s better to manually control the updates so that you can wait for a few days to see if users are reporting any issues with the latest version before deciding to update your web browser.
There are many ways you can control Google Chrome Automatic Updates. We are going to discuss them one by one. Try them out and stick with the one that best works for you.
Disable Google Chrome Automatic Updates on Your Device
Every time you start the Google Chrome browser, it automatically searches for any newly available updates and accomplishes this task Google Chrome uses Google Update (gupdate) and Google Update (gupdatem). In order to manually control Google Chrome updates, these two services need to be disabled for good.
Here how you can disable gupdate and gupdatem services on the Chrome web browser from the system configuration window.
See the steps below to turn off Google Chrome automatic updates.
Note: Bear in mind that disabling automatic updates requires caution as you may not get the latest security patches that come bundled in with the latest Chrome update by Google if you don’t use automatic updates or frequently update Google Chrome manually.
- Close the Chrome Browser window, if it’s open. Save all open tabs, bookmarks, and history to restore them later.
For that, log in to Chrome using your Google account, all current Chrome settings, bookmarks, history, and tabs will be linked to your account automatically so when you later log in with the same Gmail account they will be restored automatically. Check how to Backup your all Mozilla Firefox data. - Now to open the Run command dialogue box, press Windows Key+R on the keyboard.
- In the Run command box, type msconfig and hit enter to open the System Configuration window.
- In System Configuration windows, click on the Services tab.

- At the bottom, you will see the Hide all Microsoft services checkbox, check this option to hide all essential Windows services so that they don’t get disabled during the process.
- Now find Google Update (gupdate) and Google Update (gupdatem) and uncheck both these options from the list.
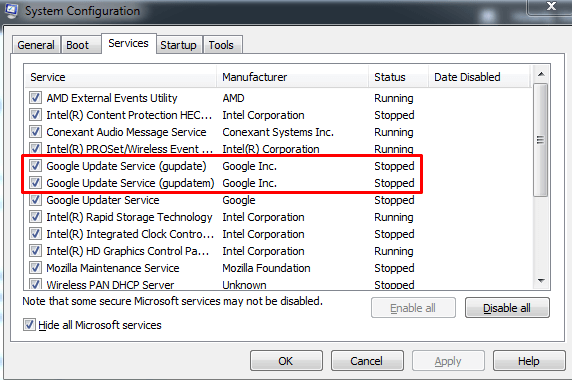
- Next, hit the Apply button and then OK.
- In the next prompt, you will be asked whether to restart your device on exit or close the settings window without restart. You can choose any other two options based on your preference.
That’s all. You have successfully managed to disable automatic updates on Google Chrome.
Now to ensure that the settings have been saved properly, open Google Chrome browser > click on Chrome menu > Help > About Google Chrome.
Google Chrome will start the search to find new Chrome updates. If you get a message saying “An error has occurred while checking for updates: Update check failed to start (error code 3: 0x800704C7)”, it means automatic updates in the Chrome Browser have been disabled.
Note: If the next time when you open Google Chrome and asked to provide administrative access to enable automatic updates, simple choose NO.
Want to Enable Again?
Now that you have disabled automatic updates on Google Chrome, your browser won’t be updated to the newer version without you manually updating the browser or re-enabling the Google Update services in the System Configuration’s settings tab.
You can also apply the steps mentioned below in case you get the ‘Can’t connect to the Proxy Server’ error in Google Chrome.
- Close the Google Chrome browser.
- Open the Run command box by pressing Windows key+R and type in msconfig in the box.
- Select the Services tab in the System Configuration window.
- Check the hide all Microsoft services options below the options box.
- Find Google Update (gupdate) and Google Update (gupdatem) options on the list and check both options.
- Now hit APPLY and then OK button and Restart your PC.
To make sure that the automatic updates are enabled in Chrome, head to Chrome > Menu > Help > About Google Chrome, the web browser will start searching for new updates automatically.
Recommended Google Chrome Tutorials: