
To be able to hide photos on an iPhone is a luxury, especially when we often lend our phones to other people. All of our phones are likely to have some private pictures that we’d never wish to get discovered, and offering our unprotected phones to others poses an unnecessary threat to exposure.
It could be the screenshots of some personal messages or photos of that trip you never told your parents about, or it could be just another old selfie that you don’t hate enough to delete but is embarrassing enough never to show anyone. In any of these situations, hiding photos is the ultimate solution to prevent your friends, family, or nosy children from sneaking a peak. Here are the details:
How to Hide Photos on an iPhone
Using the photos app, anyone can easily hide photos on iPhone, iPod Touch, or iPad. Although it is a quick way to get the job done, unfortunately, it is not infallible. That is because you can only remove the desired images from the available view section within the Photos app, but you can’t tuck them safely in a locked vault.
Instead, they are moved to the Hidden folder listed under Utilities in the Albums tab, free to be accessed by anyone who taps on it. This renders the process relatively unsafe.
Therefore, only use this method to hide photos on the iPhone when you’re sure the person you’re giving your device to will not think to check for the hidden folder.
- First, tap on the home screen icon and open the Photos app.
- Then, click on the album that contains the photos you want to hide.
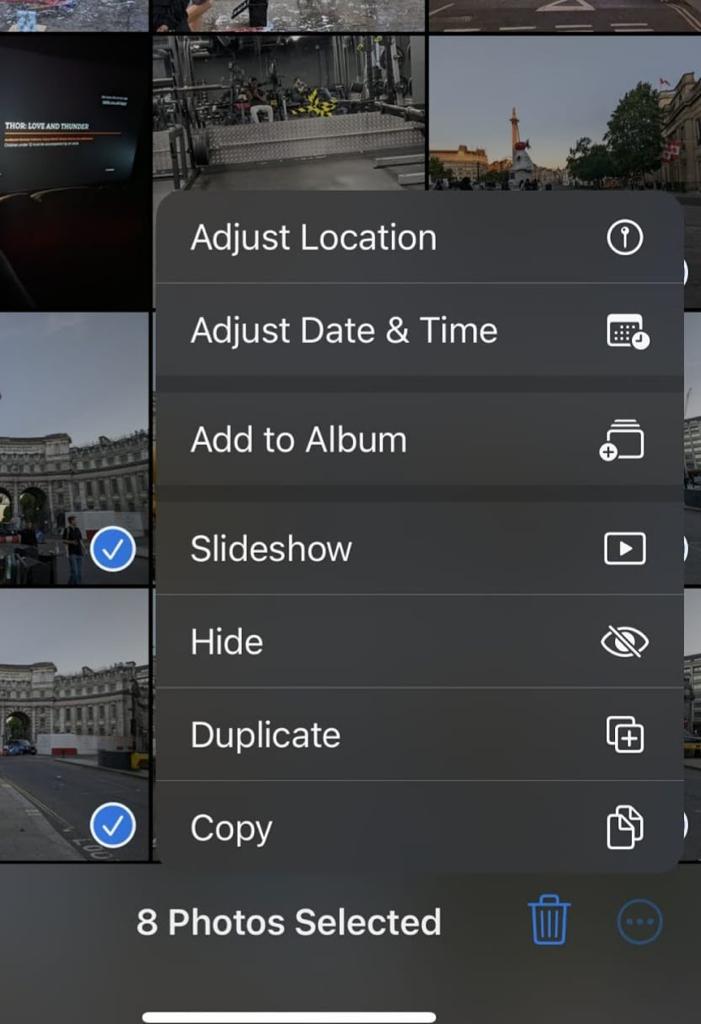
- Click on the select button in the top right corner to gain access to the multi-selection menu.
- Select all the photos you want to hide.
- Then select the Overflow icon located in the bottom right corner.
- This will relocate the selected photos to the hidden album. You can access it by going to the albums tab> utilities > hidden album.
How to Unhide or View Hidden Photos
To unhide the hidden photos, follow these steps:
- Open the Photos app.
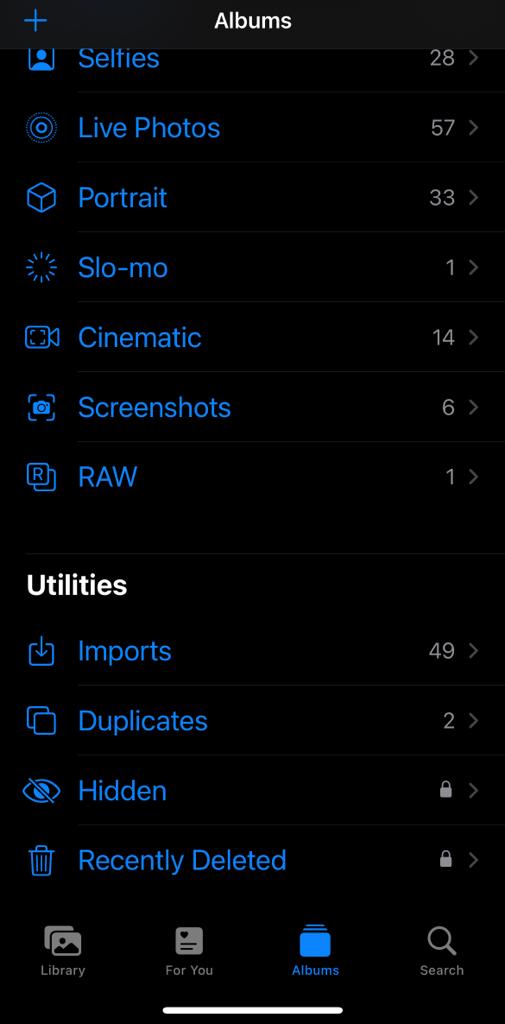
- Click on the Albums tab.
- Scroll down and go to utilities and find the hidden folder. You may get a Face ID prompt to gain access.
- Tap on the Select button on the top right side.
- Multiselect all the photos you want to unhide.
- Then tap on the Overflow button at the bottom left corner.
- Select to unhide on the pop-up menu. The photos will be moved to their original album. Alternatively, you can also select a specific album for their relocation.
How to Hide a Hidden Album
If you want to take it even further, then try this technique to hide the Hidden album on your iPhone.
As we mentioned, photos that you hide on an iPhone are still visible if found in the hidden albums under the “Utilities” section. Thus, to remove that risk, you can enable an option to hide the Hidden album so that it is no longer visible, making your photos untraceable.
Here is how you do this:
- Go to the Settings app.
- Scroll down to select photos.
- Scroll down again to find the hidden album option.
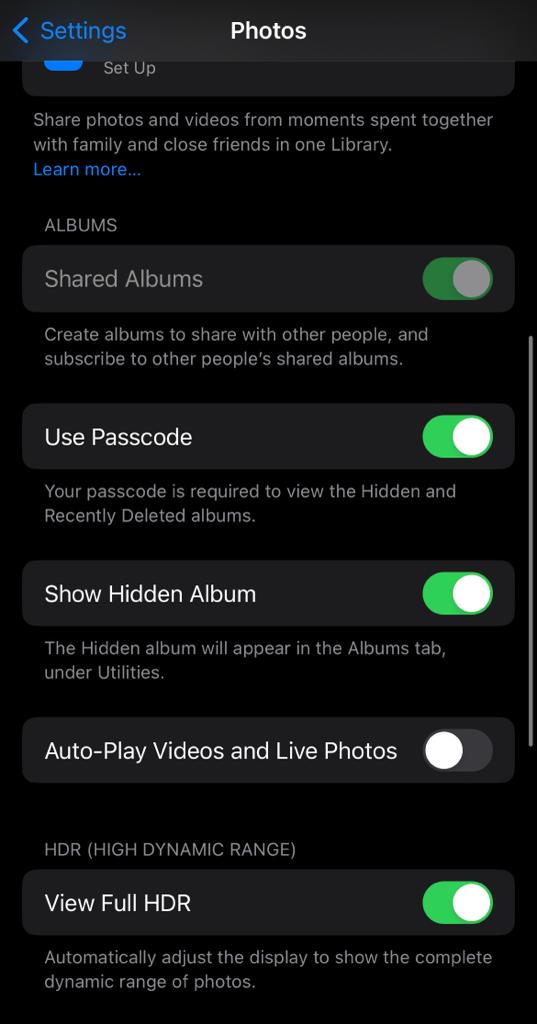
- Once you find it, turn off the toggle on “show hidden albums” to hide the Hidden albums that are currently located in utilities under albums in the photos app.
You can now check that the hidden albums no longer appear in the photos app. Furthermore, when you get your phone back, you can simply go back to settings and turn on the toggle of Show Hidden Albums to find your photos again.
How To Hide Photos on iPhone Notes
Using the Notes app is another great technique that enables users to hide photos on their iPhones. All they have to do is upload them on a note and lock it with a password. Or you can follow the instructions below to learn how.
- Open the Notes app on your iPhone.
- Click the pen in a box icon on the lower right corner to create a new note.
- From the menu bar, select the camera icon to upload photos on this note, and then tap on the Photos and Videos option.

- Select all the pictures you want to hide.
- Then hit the Add button in the upper right corner.
- Finally, Tap done. Your note will be saved.
Now all you have to do is lock the note to prevent it from getting accessed.
How to Lock The Note
- Select the note that you just created and tap on the three-dot icon in its top right corner.
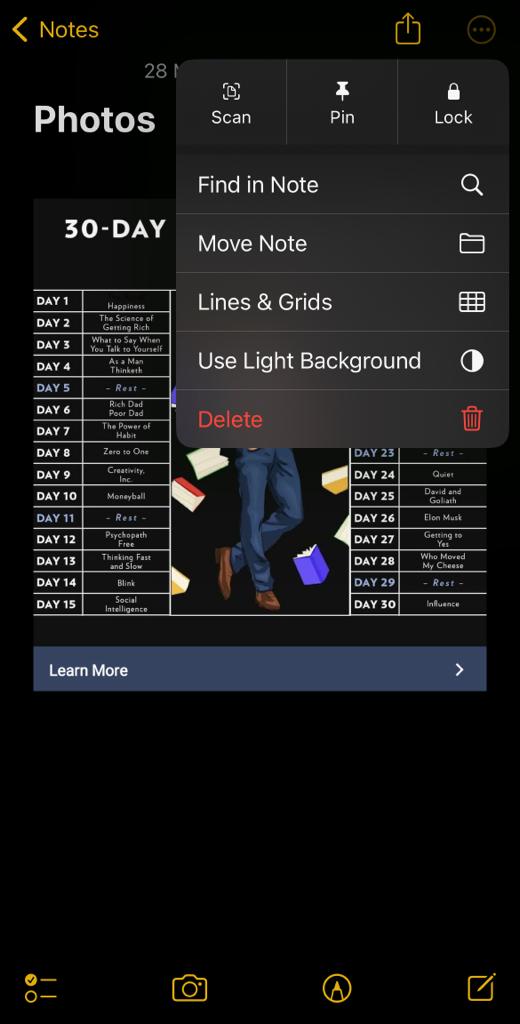
- A menu will appear, where you need to click on the lock option.
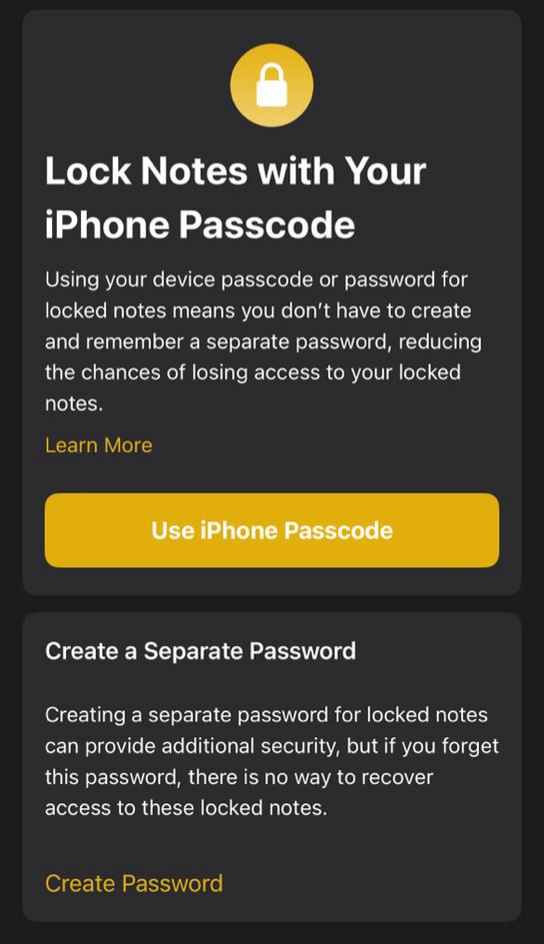
- You will be prompted to create a password and verify it. You can choose to leave a hint and toggle on the use of Face ID or iPhone passcode to access the note.
- Select Done when you’re finished setting up the password for the note.
- An “unlocked” lock icon will appear on the note on the top right side, which you must click to seal the photos. Then a pop-up will appear that reads the Note is locked.
Now, you only have to delete the originals from the photos app because you have secured the copy version in the note. And that’s it; your photos are completely hidden from anyone who might use your phone.
To access them, just open the note and type in the password that only you know. This way, only you can view the photos at any time. But make sure to tap on the “unlocked” lock icon on the note every time you open it to properly seal the photos again, or just close the Notes app from the recent apps before you hand over your phone; that will also do the trick.
Conclusion
The idea of giving your unlocked phone to someone is enough to cause stress-induced sweats. However, with these tricks, you are sure to find a loophole to keep your secrets and hide photos on your iPhone forever.