Today, In this tutorial, I am gonna show you a little trick to Reveal Passwords behind asterisks in Your Web Browsers.
Online security is difficult nowadays and protecting yourself from hackers is even tough.
When I was just a child of 12 or 13, I wonder how can I hack Gmail account? Is there any way to reveal the passwords users use to log in to their accounts?
Well, I don’t have any intentions of misusing, just curious how can I do it?
And now I know many of the ways to exploit accounts in many ways. Even we can force browsers to save passwords.
Reveal Passwords behind Asterisks (*)
To get started, you would like to follow the below steps. it’ll solely take a moment or 2.
- Open a Web browser on your PC and go to any login page.
- Enter your username and password which is required to go to a further step.
- Once you have entered your password, the real trick goes from here.
- I will use a Gmail login for this demo.
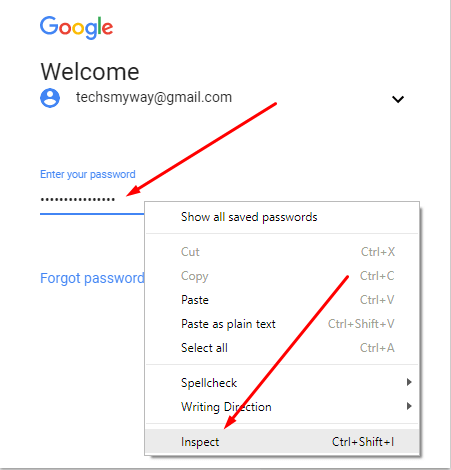
- Just Right-Click on the password field and click the “Inspect” option from the pop-up list.

Quick Tip: You can press Ctrl+Shift+I to open it directly.
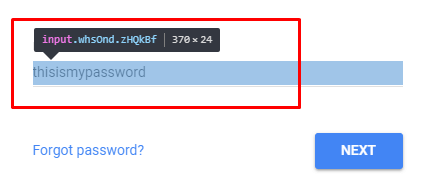
- After clicking that, a window will open either on the right side or downside of the screen.
- Then go to the “Input#password” Column and there find type=”password” in the above script.

- There replace the string “password” with the string “text” and hit enter.

- Then you can see your real password as English letters.

That’s it.
You’re all done with Revealing Passwords behind asterisks.
Meanwhile, if you want to undo this task and let that password restore as default as asterisks.
Then Just go to the Input#password column in the “Inspect element” window and then replace that script code string “text” with “password” as default. And it will restore to default.
NOTE: This tutorial is for education purpose only, don’t misuse anyone’s credentials and personal information. We are not answerable for any problems relating to this.
If you have got any doubts and not getting how to show passwords hidden behind asterisks in Any login pages, Then Watch The Below explained tutorial for this guide.
Whereas the procedure is almost the same in all Web browsers but in some browsers, the options will vary. So, make your path according to that options.
If you learned something from today’s tutorial, please share it with your friends!
Related:

